Author Archives: cornelisG

About cornelisG

Like many guitar players Neill struggled to understand music theory until he learned about the inherent properties of the instrument that in fact make it the best instrument for learning theory on. His specialty is helping people who fear they are too old to learn music theory. Visit the GTR Store to support his work.

Lesson 6: The Five Fret Pattern

Derek Trucks
Remember you can zoom in and out on the images in this post by pressing Ctrl + and –

I consider the pattern taught in this lesson to be one of the most important things you can learn in order to help your guitar playing. Once you understand this simple pattern your understanding of how the fretboard works will take a giant leap forwards.

One of the things guitar players struggle with when learning music theory is the confusing way in which numbers are used to describe different musical concepts. For example you may have seen how music intervals (the distance between two notes) are described with terms such as Major 2nd or Perfect 5th. As a guitar player it is confusing to relate these terms to the fretboard because they don’t describe the distance in fret numbers, something which you can easily count.

On top of that you might hear people use terms such as whole and half steps or whole and half tones. This is just another needless level of complexity that doesn’t provide any helpful insights. (In case you are wondering half tones and half steps are a distance of one fret and whole tones and whole steps are two frets distance).

In order to make things much easier to learn and help you understand the inner workings of the fretboard we are going to simplify things. By describing music intervals simply by counting the distance in frets between two notes you easily start to notice patterns that will help you learn chords and scales much quickly and you’ll be able to play them all over the neck with ease.

I call the pattern in this lesson the Five Fret Pattern. The pattern is found by placing your finger on any note on the fretboard, in this first example we’ll pick G# on the low E string. This will be our root note or zero point. Since we’re counting a distance we’ll count this as 0 (in the same way that the start of a ruler is 0 cm or inches).

Five Fret Pattern 1st String

So starting with your finger on the 0 in the white circle, count 5 frets along the string until you reach C#. Now you can also find C# on the 2nd string (the A string) where you see the number 5 in the white circle. The next string up, the number 10 in the white circle is the equivalent of moving 10 frets along the 1st string from the G# on the 1st string. So you can see how all the numbers in this diagram show fret distances from the starting point. Note how the number 24 in the diagram shows a C# but two octaves higher. (You get the next octave up every 12 frets. E.g. 12, 24, 36 etc).

As you can see moving up a string is the same as moving 5 frets along the string. This pattern is easy to remember because its easy to mentally count in groups of 5. The only thing you have to be mindful of is that because of the way the strings are tuned in standard tuning that the pattern on the highest two strings is shifted over towards the bridge by 1 fret.
In the below diagrams you can see what the pattern looks like when you choose your starting point on one of the other strings. Remember that this pattern appears the same way anywhere along the fretboard. All it does is show you relative fret distances.

Five Fret Pattern 2nd String

Five Fret Pattern 3rd String

Five Fret Pattern 4th String

Five Fret Pattern 5th String

Five Fret Pattern 6th String

How knowing the Five Fret Pattern can help you play chords and scales all over the fretboard

Now I’ll show you how this can help your guitar playing. If you know for example that the formula for a Major chord is 0, 4, 7 (0 is the root note plus a note 4 frets along and a note 7 frets along) then you can play Major chords all over the neck by simply placing your fingers on a 0, 4 and 7. (Or equivalents an octave higher. 0+12 = 12, 4+12 = 16 and 7+12 = 19).

Put your finger on a random place on the fretboard and see if you can visualise the Five Fret Pattern with the help of the diagrams. Now see if you can find a 4 and 7 or a 12, 16 and 19 that you can fret at once. Strum these notes and you will have played a Major Chord.

Now see if you can find chords using the Minor Chord formula 0, 3, 7 (Or on higher octaves 0+12 = 12, 3+12 = 15 and 7+12 = 19).

You can also use it to play scales all over the neck. Here is the formula for the Major Scale: 0 – 2 – 4 – 5 – 7 – 9 – 11 – 12. Choose a starting point and count the frets along the string (or on other strings using the diagrams) to find the notes in the scale. 0 is the root note, the next note is 2 frets along, the next one is 4 frets along etc.

Learning this pattern in conjunction with all the names of the notes on the guitar fretboard is one of the best things you can do for your musical education.

Video 002: The CAGED System or CAGED Chord Pattern

This video lesson shows you the CAGED System or CAGED Chord Pattern as I like to call it. This video can be viewed in HD. If you like this video please spread the word by pressing the ‘Like’ button at the top of the post. Thank you!

This video accompanies the lesson: The CAGED Chord Pattern You’ll be given the opportunity to download a more detailed lesson including diagrams for all the patterns and Major triads when you sign up to the GTR Newsletter.

Lesson 5: Moveable Chords Part 1: Major and Minor Chords

John Frusciante
Note that in all lessons on GTR the strings are numbered in a different, more sensible way than most guitar instructors and resources teach: Numbering The Guitar Strings

One of the great things about the guitar compared to other instruments is that you can move finger placements (chord shapes) all over the fretboard in order to get similar chords in different keys. It’s important to understand this about the guitar because I believe that many people become confused about music theory by ignoring this fact.

Unfortunately 99% of guitar teachers and resources still try to teach music theory from the perspective of the piano. I’m sure you’ve heard people say that the piano is the best instrument to learn theory on? Well that’s flat out wrong since on a piano you can’t even move a Major chord around the keys without constantly changing your finger positions. If you want to play the guitar then you should learn music theory from the perspective of the guitar.

In this lesson I’ll show you 4 basic moveable chords that will provide most the chords you’ll use in most pop and rock music. They are the moveable Major and Minor chord shapes. The photos are taken from my perspective as I’m looking down at the fretboard, holding the chord shapes with my left hand.

Moveable Major Chord

There are two moveable major chord shapes. In the first shape you place your index finger on the 1st string, your ring and little finger on the 2nd and 3rd string, but 2 frets down towards the pickups or sound hole. Finally the middle finger goes on the 4th string on the central fret. Below is a diagram of this chord shape.

To know the name of these moveable Major and Minor chords you just have to look at the name of the note you are fretting with your index finger on the 1st string. This is called the root note. (If you want to learn all the names of the notes on the guitar sign up for the GTR Newsletter for a free guide-book) You can slide this shape all along the 1st string to play different Major chords. An example of this type of chord is the A Major chord.

A Bar Major Chord
A Bar Major Chord

The second moveable Major chord shape starts on the 2nd (A), the low is E is muted or not played. Put your index finger on a fret on the 2nd string and either use your ring finger to hold down the 3rd, 4th and 5th strings two frets down or use your middle, ring and little finger to do so.

If you want you can play it as a full barre chord and use the other end of your first finger closest to your hand to hold down the 1st and 6th string as well but the root note is still on the 2nd (A) string. An example is this D Major chord. Again you can slide this chord along the 2nd string and you just have to look at which note is being held down on the 2nd string to know the name of the chord.

D Major Bar Chord
D Major Bar Chord

Moveable Minor Chords

The moveable minor chords are very similar to the Major chords. The first Minor chord shape is as follows. Index finger holding a barre across all the strings with the ring and little finger holding down the 2nd and 3rd strings two frets down. An example is this A Minor chord. The root note is on the 1st (low E) string.

A Minor Chord
A Minor Chord

The other shape is with the index finger holding down the 2nd (A) string, the ring and little finger holding down the 3rd and 4th string two frets over and the middle finger holding down the 5th string on the fret in between. An example is this B Minor Chord. The root note is on the 2nd (A) string.

B Minor Chord
B Minor Chord

Lesson 4: The CAGED Chord Pattern

John Mayer
Note that in all lessons on GTR the strings are numbered in a different, more sensible way than most guitar instructors and resources teach: Numbering The Guitar Strings

A learning tool that has become quite popular over the past few years is the CAGED chord pattern. The guitar is set up and tuned in such a way that you can play chords in several positions all over the neck. This means that rather than just being able to play a C Major chord in one place on the fretboard you can learn to play it in 10 different positions (5 in each octave). Each chord position has its own feel which gives you a wider palette of sounds to choose from when playing. It is also a great tool to help you learn all the note names on the fretboard as well as the major scale.

As its name shows, the CAGED chord pattern is a pattern of 5 chord shapes. These are the C-shape, A-shape, G-shape, E-shape and D-shape. Have a look at the previous lesson to see what these chord shapes look like: Lesson 3: Basic Guitar Chords For Beginners.

Now this is the part that can be a bit confusing. In order to be able to use the CAGED chord pattern you need to learn the shapes of those 5 chords and for the moment separate them from the specific notes that are being played. So look at the chord diagrams for the chords C, A, G, E and D and pretend they are blank chord finger patterns. Memorise how you have to hold your fingers for each of those chords. How you hold your fingers for each chord is what we call its shape.

So lets say you want to find out what the other 4 positions of the C Major chord look like. To do that you map out all the notes that make up the C Major chord (C, E and G) as I’ve done below.

C Major Triads

You should recognise the C Major chord on the left side of the image at the 1st, 2nd and 3rd frets. In this position you won’t normally play the two G’s on the 1st and 6th string but you could if you wanted to. That’s the C-shape of the C Major chord.

The next letter in the CAGED chord pattern is A which means the next C Major chord will have the A-shape. Can you see where the A-shape appears in the image? It’s at the 5th fret. The G-shape appears at the 7th and 8th fret, the E-shape at the 9th and 10th and the D-shape at the 12th and 13th fret (the notes at the 13th fret are the same as the 1st). So now you can play a C Major chord at 5 different places between the 1st and 12th fret (so 10 different places across the 2 octaves of a guitar fretboard).

Lets look at what the CAGED pattern look like for the A Major chord (made from the notes A, C#/Db and E).

A Major Triads

Again you should recognise the A Major chord on the left side of the image. The next letter in the CAGED pattern is the G-shape which you can see at the 4th and 5th fret, the E-shape at the 6th and 7th, the D-shape at the 9th and 10th and the C-shape between the 10th and 12th fret.

You can repeat this method for the other chords G, E and D. Just start with the chord in the open position (at the first 3 frets) then find the next shape by looking at which letter shape appears next in the word CAGED. BTW you can see in the A Major diagram above that the D shape links in with the C shape. This means that the pattern repeats endlessly CAGEDCAGEDCAGED etc.

So the order of shapes for these 5 chords is as follows, starting from the open position at the 1st to the 3rd fret.

CAGEDCAGED etc.
AGEDCAGEDC etc.
GEDCAGEDCA etc.
EDCAGEDCAG etc.
DCAGEDCAGE etc.

I’d advise you to concentrate on learning the pattern for these five chords until you have a good feel for where they are in relation to each other. It won’t take long until you can find all the chord positions for each chord without thinking about it.

The CAGED pattern doesn’t just apply to the chords C, A, G, E and D. It holds for all major chords, F#, A# and Eb for example. Just take a look at the image below which shows all the notes for the F# Major chord (the notes F#/Gb, A#/Bb and C#/Db). You can easily spot the CAGED pattern shapes on the fretboard.

F# Major Triads

The E-shape appears at the 3rd and 4th fret, the D-shape at the 6th and 7th, the C-shape between the 7th and 9th and the A-shape at the 11th fret.

Learning the CAGED chord pattern is a great way to gain insight into the fretboard and music theory. If you want a more in depth lesson on the CAGED pattern including more detailed diagrams I can send them to you when you sign up for the Guitar Theory Revolution Newsletter.

Lesson 3: Basic Guitar Chords For Beginners

David Gilmour

This lesson will show you a selection of basic guitar chords for beginners. These diagrams will show you the chords C, A, G, E and D as well as two Major bar-chords (moveable chords where the index finger forms an artificial bar across all the strings). Each guitar chord diagram shows you which notes to play on each string and a suggestion will be given on which fingers to use. The note names in coloured circles are where you put your fingers, those in white circles are strings that are played but not fretted while the strings marked with an X should be muted or not played.

If you are a beginner you should be careful with the bar chords since they require you to stretch your fingers and hand in a way that might be uncomfortable at first. Take things slowly and stop if you experience any pain. If you practice these chord shapes for just a few minutes a day you’ll quickly find your hands becoming stronger and more flexible.

Remember that I number the guitar strings in a different way than most people (low E, 1 to high E, 6). Your fingers are numbered as followed: index finger = 1, middle finger = 2, ring finger = 3 and little finger = 4.

C Major Chord
For this chord you should place your 1st (index) finger on the C of the 5th string, your 2nd (middle) finger on the E on the 3rd string and your 3rd (ring) finger on the C on the 2nd string. The 1st strong (Low E) is usually not played or muted.

C Major Chord
C Major Chord

A Major Chord
The 1st finger holds the E on the 3rd string, the 2nd is on the A on the 4th string and the 3rd holds the C# on the 5th string.

A Major Chord
A Major Chord

G Major Chord
The 2nd finger frets the G on the 1st string, the 2nd finger holds the B on the 2nd string. Strings G, B and E are left open and the G on the 6th string is fretted with your 4th finger. Some people hold down the D on the 5th string with their 3rd finger as well as this helps them switch between the G and D more easily.
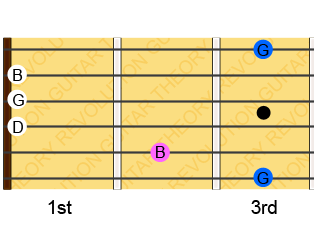
G Major Chord
G Major Chord

E Major Chord
The 1st finger on the G# on the 4th string, 2nd finger on the B on the 2nd string and 3rd finger on the E of the 3rd string.

E Major Chord
E Major Chord

D Major Chord
There are two common ways to play this chord. The first is to place finger 1 on the A on the 4th string, finger 3 on the D on the 5th string and finger 2 on the F# on the 6th string. You can either mute the 1st string or fret it at the F# with your thumb.

Another way to play this chord is with your 2nd finger on the A, 3rd on the F# and 4th on the D. It is worth practicing this way of holding the chord as it will help you later on when you play barred versions of this D-shape.
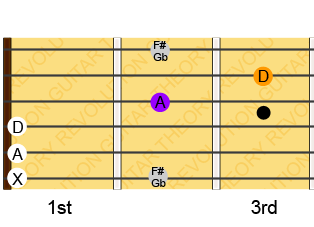
D Major Chord
D Major Chord

Bar Chords

Bar chords are chords where you hold down all strings across the neck with your index finger and use your other fingers to hold a chord. Think of it as using your finger as a capo.

This chord may be a bit hard to hold if you are a beginner. Don’t push yourself too hard as you might cause excessive strain in your hand and wrist. You can always come back to this chord at a later time.

The 1st finger holds the A on the 1st string, 3rd finger holds the E on the 2nd string, the 4th finger holds the A on the 3 string and the 2nd finger holds the C# on the 4th string. If you can, try holding your first finger down across all the strings so that you fret the top two strings A and A as well. This chord shape is commonly used to hold the F Major chord. All you need to do is slide this shape down to the first fret.

A Bar Major Chord
A Bar Major Chord

This chord may also be a bit hard to hold if you are a beginner. But there are several ways you can play this chord so choose one that is most comfortable for you. Remember you can always come back to this chord at a later time after you’ve developed more hand strength and can stretch your fingers more comfortably.

The most difficult way to hold this chord, but the one that will give you the most flexibility in the future is to place your 1st finger across all the frets at the 5th fret. Then place your 2nd, 3rd and 4th fingers on the A, D and F# notes on the 3rd, 4th and 5th strings.

The 2nd way is to mute or not hold the notes on the 1st and 6th strings and only play the central 4 strings. This way you only have to hold one note with your 1st string.

The final way is to hold the D on the 2nd string with your 1st finger as before but this time to use your 3rd finger to hold down all the notes on the 3rd, 4th and 5th strings. This is how many rock, punk and metal players hold down the chord (often leaving out the note on the 5th string as well). This may be the way you first hold this chord shape, but you might find it limiting your ability later on and you’ll want to try the other ways when you are ready. This shape is a common way to play the B Major chord, just play this shape at the 2nd fret.

D Major Bar Chord
D Major Bar Chord